Friday, January 29, 2016

Nightshade-Free Chicken Curry

Living in Malaysia has taught me many things: how to manage without hot water at the kitchen sink, remembering to wear closed shoes at the market, being organized about laundry during monsoon season. But the best thing about Malaysia is the food. Hands down. These people can cook.

When I came to Malaysia, I was not on any kind of dietary restrictions, so I tried everything. I even went to a cooking class, where I learned how to make traditional Malay curry. It was an amazing recipe, with a gorgeous warm earthiness from the spices and coconut milk.

Now that I'm on the autoimmune protocol, traditional curry - with its seed spices and nightshades - is off the menu. So I decided to take another look at that recipe I learned years ago and leave out the seed spices and nightshades. You know, just to see what happens. Turns out, you can make a pretty awesome curry without those things. What I did still include was the berry/fruit spices, since they are only on the "be cautious" list. They add a lot of flavor to the curry, so if you can tolerate them, I recommend leaving them in.

I also cut up and added about 2 cups of a local gourd to my pot. Feel free to add chunks of carrot, pumpkin, potato (if tolerated), or cassava. These are all traditionally used in local cooking, so the flavors will blend nicely.


Ingredients
½ cup high-temperature cooking oil
5 cardamom seeds
5 cloves
2 cinnamon sticks (3" in length)
2 medium shallots (mine were 2" in diameter)
4 cloves garlic
100g ginger (1/3 cup)
15g turmeric root (2 Tbsp)
4 chicken drumsticks or thighs
1½ cups coconut milk
½ cup water
½ - 1 tsp salt


Directions
1. Put on your apron. Peel your turmeric root, ginger, garlic, and shallots. Put them into a blender or small food processor with a little water, and puree until fairly smooth. (I used the mini blender that came with my food processor set.)
2. In a large cooking pot, heat the cooking oil, and fry the spices for 2-3 minutes. Lower the heat, and add the shallot, garlic, ginger, and turmeric pastes.
3. Cook on low heat until aromatic, being careful not to burn the mixture.
4. Add the chicken and brown on all sides. Add vegetables, if using.
5. Pour in the coconut milk and water.
6. Simmer until chicken is tender, about 15-20 minutes, stirring occasionally.
7. Sprinkle in salt and stir well.
8. Serve hot.

Sunday, September 27, 2015

AIP Breaded Fried Mushrooms


So, a couple days ago, I tried this recipe for AIP Buttermilk Popcorn Chicken that was seriously awesome. I'm talking majorly delicious noms here. It was so amazing that I actually made it again the next day. (I could eat these every day. Not that I'm advocating it. But I won't judge.) When I finished coating the chicken, I was surprised to have a bit of batter and flour mixture left over. I looked at it wistfully...and then I remembered the mushrooms in the fridge. And I thought, "Oh yeah."

I've adjusted the seasonings a bit, as the mushrooms aren't marinated and therefore don't take on as much flavor as the chicken does in the original recipe.

Ingredients
1 pint white button mushrooms

1/2 cup coconut milk
1/2 lemon, juiced
1 tsp salt
1/2 tsp garlic powder
1/2 tsp thyme
1/2 tsp turmeric powder

1/2 cup cassava flour
1 1/2 tsp salt
1/2 tsp thyme
1/2 tsp sage

1-2 cups lard, tallow, coconut oil or palm oil


Directions
1. Mix the coconut milk, lemon juice, salt, garlic powder, thyme, and turmeric.
2. Cut the mushrooms into quarters. Larger mushrooms can be cut into smaller pieces.
3. Place the mushrooms into the coconut milk mixture and stir until completely covered.
4. In a large skillet or wok, heat the oil on medium high.

5. Mix the cassava flour, salt, thyme, and sage.
6. Dip 5-6 mushrooms at a time into the cassava flour mixture and coat well. Remove to a plate and repeat until all the mushrooms are coated.
7. When the mushrooms are ready to fry, check if the oil is hot by flicking a small drop of water into the oil. If it sizzles, the oil is ready.

8. In batches, gently put the mushrooms into the oil. The mushrooms should not be overcrowded. Allow to fry for 3-4 minutes, or until golden.
9. Remove the mushrooms from the oil and place them on a paper towel to drain.

These would probably be pretty awesome with some ranch dressing. Give this one a try and let me know how it is!

Friday, September 25, 2015

Simple Pumpkin Puree

Okay, canned pumpkin seems like a must-have during holiday season. I mean, who can survive Thanksgiving and Christmas without pumpkin pie?? So you put on your boots and gloves and coat, and you drive to the store, hoping the canned pumpkin isn't out of stock...but why do that when it's SO EASY to make your own pumpkin puree??


Here's a quick step-by-step tutorial on making your own pumpkin puree.


First, preheat your oven to 375 Fahrenheit (180 Celsius).


Score your pumpkin around its middle. It helps to score it first, as it can be tough to keep to the middle as you cut around the pumpkin.


Next, cut through to the center along your scored line.


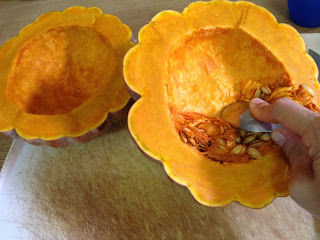
Scoop out the seeds. Keep them if you want to make roasted pumpkin seeds. There are lots of tasty recipes out there.


Put your pumpkin on a baking sheet, cut-side down. Add a cup of water.


Bake for 50-60 minutes. If you're not sure it's done, give it a little poke with your finger. If it's still firm, it needs more time.


I only baked half of my pumpkin. I sliced up the rest for dinner (coconut oil, cinnamon, and a pinch of salt, roasted at 400*F for 45 minutes).


When your pumpkin is done baking, it should look like this: tender, squashy, and easy to spoon out.


Scrape the sides of the pumpkin gently. The rind is tender at this point and will tear easily - as you can see! I got at least two cups of pumpkin there. If you want to make it smoother for pies and puddings, put it in the blender or food processor for a minute. And you're done!

Saturday, September 05, 2015

Chicken Vegetable Saute with Pumpkin Sauce

Yeah, I know it sounds weird. I was honestly a little worried putting it together. "Will my husband eat this? Meh, probably. Will my kids eat it? Wellll...." Yep, it was like that. The whole time I was cooking.

In the end, they all ate it. My five-year-old even said it was nice. Win.

Ingredients
1/4 cup olive oil
1 yellow onion, chopped
2 medium carrots, cut into 1/2 inch pieces
1 tsp basil
1 tsp ginger
1-2 tsp salt
1/4 tsp pepper (omit for strict AIP)
1/2 head cauliflower (about 2 cups), stems removed and florets cut into bite-sized pieces
3-4 chicken breasts, also cut into bite-sized pieces (I have two small children. Everything gets cut into bite-sized pieces.)
3 cloves garlic, pressed
1 1/2 cups pumpkin puree

Directions
1. In a large skillet or wok, heat the olive oil and add the onion and carrots, as well as your seasonings. Saute covered for about 6 minutes.
2. Add your cauliflower and chicken and stir well. Cover and cook for 8-10 minutes, or until cauliflower is softening. 
3. Add your garlic and pumpkin puree. Mix well and simmer for 2-3 minutes to allow the flavors to blend.
4. Dish it up and dig in!

Note: The pumpkin adds a natural sweetness, so just be aware of that, in case you don't like your main course too sweet. You can always add more ginger or pepper if you find that it's too sweet for your liking.

Broccoli Salad with Carrot and Apple

This salad was a happy surprise. I didn't set out to make some miraculous dish or anything. I just wanted to make a salad my friends would be reasonably keen to eat at my birthday party! I'm happy to say, it turned out pretty decent.

Ingredients
1 large head broccoli, stems removed and florets cut to bite-size
One large carrot, shredded finely
One apple, diced 
1/4-1/3 cup dried cranberries or raisins
1/4 cup olive oil
2 Tbsp apple cider vinegar
1-2 tsp garlic paste
2 Tbsp coconut or palm sugar 

Directions
1. Mix the olive oil, vinegar, garlic paste, and sugar in a small dish. Set aside. 
2. In a large serving bowl, add the broccoli florets, shredded carrot, apple, and cranberries. Toss well. 
3. Add the dressing and mix until the entire salad is moistened. 
4. Refrigerate for several hours before serving to let the garlic mellow. Serve cold or room temperature. 

Thursday, October 02, 2014

Apple Cabbage Salad with Honey and Cranberries

This salad is currently a personal and household favorite. It is really, really good. It's a recipe I put together when I was going through a "throw anything into the bowl to make a salad" phase. And it turned out fabulous.

Ingredients
1 red apple, chopped
2-3 cups red/purple cabbage, chopped
1/4 cup dried cranberries
2 Tbsp honey
2 Tbsp coconut oil, melted
2 Tbsp apple cider vinegar

Directions
1. Chop apple and cabbage.
2. Put them in a bowl large enough for some tossing and mixing. Add cranberries.
3. Drizzle in the honey, oil, and vinegar and mix well. Use your hands if you want to. And if you've washed them.
4. Serve it up!

Monday, May 05, 2014

AIP Cranberry-Apple Sauce

Yes, I realize this post is a bit of an anachronism. Cranberry Sauce belongs at Thanksgiving and Christmas, not in May. Well, I bought cranberries and wanted to use them, so I just had to make my mom's cranberry-apple sauce!

Well, sort of. My mom's recipe calls for butter and brown sugar and pecans and marshmallows, none of which strict AIP-followers can have (unless, of course, you make paleo/AIP marshmallows and have successfully reintroduced nuts). Anyways, I really wanted to try making my mom's recipe AIP-friendly, so I did! Here's a cranberry sauce you can happily serve at your next holiday gathering, or just any old time you want a delicious side to pair with your roast chicken...or salmon...or pork...or midnight snack...


Ingredients
4 Tbsp coconut oil
1 bag fresh cranberries
4-6 tart apples (peeled and roughly chopped)
1/2 cup honey
1 teaspoon cinnamon
1/2 teaspoon cloves
1/4-1/2 cup coconut flakes (optional)

Directions
1. In a large saucepan or wok, sauté the cranberries in ghee or oil until most of the berries have broken.
2. Add the apples, then stir in the honey and spices.
3. Cover and simmer for a few minutes until the apples are slightly soft.
4. Put mixture into a greased baking dish. Sprinkle coconut flakes over top.
5. Bake at 350°F/180°C for about 20 minutes, or until the coconut is lightly browned. I normally serve this hot, but it's delicious however you serve it!!

Wednesday, April 23, 2014

AIP Chicken Breakfast Sausage

I recently went on holiday with some friends and planned to bring my own food for breakfast, as it's very difficult to find Malaysian breakfast foods suitable for AIP, or anything that's truly nourishing, for that matter. Plus I wanted to use chicken rather than beef or pork so that my friends could enjoy it too. 

So, I went hunting online for a breakfast sausage recipe using chicken and also one that didn't have pepper, and wouldn't you know it, it's a hard thing to find! I finally found a recipe for turkey sausage on Mickey Trescott's Autoimmune Paleo site and adapted it using chicken and dried herbs. I doubled the recipe, and it kept in the fridge for several days.


Ingredients
500g minced chicken (I put a couple large chicken breasts in the food processor and minced them using the steel blades)
1 teaspoon sage
1/2 teaspoon rosemary
1/2 teaspoon thyme
1/2 teaspoon garlic powder
1/2 teaspoon cinnamon
1 teaspoon salt
2 Tablespoons coconut oil or other high-heating fat

Directions
Combine all the ingredients except the oil and refrigerate for at least 30 minutes to allow the flavors to blend.
Add the oil, form 1/2" thick patties, and cook in an oiled skillet over medium heat, about five minutes per side or until they're no longer pink in the middle.

I like using this recipe as part of a "breakfast skillet" by cooking the patties and setting them aside while I cooked the rest of the skillet ingredients. My favorite skillet combo right now is chunks of baked sweet potato, onion, garlic, kailan (a heavy, flat, leafy green similar to collard greens), and a sprinkle of salt. In the photo, you also see a salad of raw grated beet, apple, carrot, dried cranberries, and a squeeze of lemon juice. The pickles were a little weird for breakfast, but I needed some probiotic food on my plate, and these are homemade! :)

Friday, April 11, 2014

AIP Ginger Beef Stir Fry

So, I started this blog ages ago, but obviously I never really posted much. In fact, I forgot I even had it. Today I rediscovered it, and so I'm going to start posting things. Food things. What else would I post about??

Here's my first recipe. I adapted it to my current dietary restrictions, so if you're not on the AIP (Autoimmune Protocol), feel free to add soy sauce or pepper or chilies or whatever else you fancy. I found that the marinade and sauce made this stir fry plenty flavorful and that it didn't need the usual addition of soy sauce.
  
Ingredients
The marinade
2 Tbsp balsamic vinegar
2 tsp salt
1 tsp ginger powder
1 tsp garlic powder

The sauce
¼ cup broth
2 Tbsp coconut oil
2 tsp salt
1 tsp ginger powder
1 tsp tapioca powder

Everything else
2-3 Tbsp coconut oil
300-400g beef, cut across the grain into ¼ inch slices
1 head fresh broccoli, cut into florets
1 carrot, sliced thinly
1 small onion, roughly chopped
A handful of sweet peas

Directions
1. Prepare the marinade in a bowl.
2. Add the beef and let it marinate at room temperature for 30 minutes.
3. Prepare the sauce and cut the vegetables. Set them aside.
4. Heat 2 tablespoons of coconut oil in a large skillet over medium-high heat.
5. Cook the beef in a single layer for 1-2 minutes or until mostly browned.
6. Remove the meat and set it aside. If the pan is dry, add another tablespoon of coconut oil.
7. Add the vegetables and cook them for about 1 minute, stirring constantly.
8. Add 2 tablespoons of water and cover the pan for 5 minutes. Uncover and cook, stirring constantly, until the vegetables are tender to your liking.
9. Return the beef to the pan, add the sauce, and mix well.
10. Serve and enjoy!

Friday, January 13, 2006

I've been here for nearly two weeks, and already I'm falling in love with the place. It is, as my sister's co-worker said, a beautiful location. I've never cared for the winter, which works out quite well, since this place never sees temperatures below about 75 F. The scenery is lush and there are palm trees everywhere. Occasionally I'm struck again with the thought, I'm really in Malaysia! I really am here!

The teaching position is a joy. I'm becoming quite convinced that God has been preparing me and directing my experiences for the last several years in order to ready me for it. My job at the science museum, the year I spent substitute teaching, my time overseas in Europe when I was a little girl...all these things and many others have made it so easy to adapt to the demands of the job...which hardly feel like demands at all! I can't imagine a more suitable job for myself.

The families working here have been very welcoming. They invite me to eat with them and join their weekend activities. My first weekend here I got to go to a water park with a few different families. What a blessing they are to me! Tonight one of my students is sleeping over. Such fun!

I'm really enjoying living above the school as well. Talk about an easy commute! It's also great because there are three families that live in this neighborhood. I can walk to their homes in a matter of a few minutes! Most of them walk to school, which tells me that this is a safe place. I'm so thankful that it is.

So there you have it. The beginning of my life in Malaysia. :)