Thursday, March 24, 2016

Dairy-Free Italian Cream Sauce, AKA Awesome Sauce

I cannot tell you how excited I am to share this recipe with you!!! But first, a little story.

Long before I was a twinkle in my mother's eye, she took a cooking class. She learned many French-style recipes, which, of course, meant lots of cheese, cream, and butter. I loved those recipes. Decadent, flavorful masterpieces.

My all-time favorite was Spaghetti Nest, made by cooking whole chicken breasts in Italian seasoning and then adding flour, sour cream, and wine to the leftover juices in the pan to make a delicious gravy, which we poured over the chicken and the spaghetti, which had been smothered in butter and Parmesan cheese and lightly toasted in the oven. I could have eaten it every day of my life. I'm talking serious noms here.

Fast forward to present day, and I'm following the autoimmune protocol, doing my best to heal from 25 years of Crohn's disease.

Goodbye, cheese. Goodbye, cream. Goodbye, butter. <sob>

But not goodbye to flavor. I've learned how to add lots of flavor to my cooking. I just had to do without those specific flavors. Until NOW.

Without further ado, I present to you one of my greatest sources of dietary happiness. I hope you love this recipe as much as our family does!


Ingredients*
1/2 cup chicken drippings**
1/4 teaspoon salt, or more to taste
1 teaspoon Italian seasoning (if you are AIP, avoid mixes that contain paprika)
1/4 cup white wine
1/3 cup full-fat coconut milk
1 Tablespoon tapioca starch

Directions
1. Pour the white wine into a skillet (you want a nice, wide surface area to cook off the alcohol and also to heat the sauce evenly after you've added the tapioca starch). Heat to boiling and then simmer on low for 1-2 minutes, until it has mostly evaporated. You can skip this step if cooking off the alcohol isn't necessary for you.
2. Add the chicken drippings and Italian seasoning and simmer for another 4-5 minutes. Turn off the heat.
3. In a small bowl, mix the coconut milk and tapioca starch until no lumps remain. Pour the mixture into the pan and stir until well blended.
4. Heat the sauce on low, stirring constantly just until it thickens, and then turn off the heat. (Do not let the sauce come to a boil, unless you want your nice thick sauce to become a thin soup. I learned this the hard way.) If the sauce becomes gloopy, you can blitz it in a blender for a few seconds.
5. Serve it on chicken, spaghetti, spaghetti squash, or zoodles. Pour it over your broccoli. Heck, I've even dipped cassava chips in it! (My two-year-old likes to dip her fingers in it and use it like body butter, but then, she is two...)


*This recipe doesn't double well due to the amount of time it takes to evaporate the wine. Of course, if you're not evaporating the wine, double away!
**I find that the best flavor comes from the juices on the bottom of the pan after roasting a chicken: a bit of fat and and a bit of saltiness (assuming you add salt when you roast chicken, which you totally should because it's more awesome that way). I've tried using chicken broth. Don't bother. It just doesn't have the richness this sauce needs.

Friday, January 29, 2016

Nightshade-Free Chicken Curry

Living in Malaysia has taught me many things: how to manage without hot water at the kitchen sink, remembering to wear closed shoes at the market, being organized about laundry during monsoon season. But the best thing about Malaysia is the food. Hands down. These people can cook.

When I came to Malaysia, I was not on any kind of dietary restrictions, so I tried everything. I even went to a cooking class, where I learned how to make traditional Malay curry. It was an amazing recipe, with a gorgeous warm earthiness from the spices and coconut milk.

Now that I'm on the autoimmune protocol, traditional curry - with its seed spices and nightshades - is off the menu. So I decided to take another look at that recipe I learned years ago and leave out the seed spices and nightshades. You know, just to see what happens. Turns out, you can make a pretty awesome curry without those things. What I did still include was the berry/fruit spices, since they are only on the "be cautious" list. They add a lot of flavor to the curry, so if you can tolerate them, I recommend leaving them in.

I also cut up and added about 2 cups of a local gourd to my pot. Feel free to add chunks of carrot, pumpkin, potato (if tolerated), or cassava. These are all traditionally used in local cooking, so the flavors will blend nicely.


Ingredients
½ cup high-temperature cooking oil
5 cardamom seeds
5 cloves
2 cinnamon sticks (3" in length)
2 medium shallots (mine were 2" in diameter)
4 cloves garlic
100g ginger (1/3 cup)
15g turmeric root (2 Tbsp)
4 chicken drumsticks or thighs
1½ cups coconut milk
½ cup water
½ - 1 tsp salt


Directions
1. Put on your apron. Peel your turmeric root, ginger, garlic, and shallots. Put them into a blender or small food processor with a little water, and puree until fairly smooth. (I used the mini blender that came with my food processor set.)
2. In a large cooking pot, heat the cooking oil, and fry the spices for 2-3 minutes. Lower the heat, and add the shallot, garlic, ginger, and turmeric pastes.
3. Cook on low heat until aromatic, being careful not to burn the mixture.
4. Add the chicken and brown on all sides. Add vegetables, if using.
5. Pour in the coconut milk and water.
6. Simmer until chicken is tender, about 15-20 minutes, stirring occasionally.
7. Sprinkle in salt and stir well.
8. Serve hot.

Sunday, September 27, 2015

AIP Breaded Fried Mushrooms


So, a couple days ago, I tried this recipe for AIP Buttermilk Popcorn Chicken that was seriously awesome. I'm talking majorly delicious noms here. It was so amazing that I actually made it again the next day. (I could eat these every day. Not that I'm advocating it. But I won't judge.) When I finished coating the chicken, I was surprised to have a bit of batter and flour mixture left over. I looked at it wistfully...and then I remembered the mushrooms in the fridge. And I thought, "Oh yeah."

I've adjusted the seasonings a bit, as the mushrooms aren't marinated and therefore don't take on as much flavor as the chicken does in the original recipe.

Ingredients
1 pint white button mushrooms

1/2 cup coconut milk
1/2 lemon, juiced
1 tsp salt
1/2 tsp garlic powder
1/2 tsp thyme
1/2 tsp turmeric powder

1/2 cup cassava flour
1 1/2 tsp salt
1/2 tsp thyme
1/2 tsp sage

1-2 cups lard, tallow, coconut oil or palm oil


Directions
1. Mix the coconut milk, lemon juice, salt, garlic powder, thyme, and turmeric.
2. Cut the mushrooms into quarters. Larger mushrooms can be cut into smaller pieces.
3. Place the mushrooms into the coconut milk mixture and stir until completely covered.
4. In a large skillet or wok, heat the oil on medium high.

5. Mix the cassava flour, salt, thyme, and sage.
6. Dip 5-6 mushrooms at a time into the cassava flour mixture and coat well. Remove to a plate and repeat until all the mushrooms are coated.
7. When the mushrooms are ready to fry, check if the oil is hot by flicking a small drop of water into the oil. If it sizzles, the oil is ready.

8. In batches, gently put the mushrooms into the oil. The mushrooms should not be overcrowded. Allow to fry for 3-4 minutes, or until golden.
9. Remove the mushrooms from the oil and place them on a paper towel to drain.

These would probably be pretty awesome with some ranch dressing. Give this one a try and let me know how it is!

Friday, September 25, 2015

Simple Pumpkin Puree

Okay, canned pumpkin seems like a must-have during holiday season. I mean, who can survive Thanksgiving and Christmas without pumpkin pie?? So you put on your boots and gloves and coat, and you drive to the store, hoping the canned pumpkin isn't out of stock...but why do that when it's SO EASY to make your own pumpkin puree??


Here's a quick step-by-step tutorial on making your own pumpkin puree.


First, preheat your oven to 375 Fahrenheit (180 Celsius).


Score your pumpkin around its middle. It helps to score it first, as it can be tough to keep to the middle as you cut around the pumpkin.


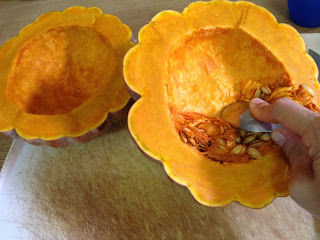
Next, cut through to the center along your scored line.


Scoop out the seeds. Keep them if you want to make roasted pumpkin seeds. There are lots of tasty recipes out there.


Put your pumpkin on a baking sheet, cut-side down. Add a cup of water.


Bake for 50-60 minutes. If you're not sure it's done, give it a little poke with your finger. If it's still firm, it needs more time.


I only baked half of my pumpkin. I sliced up the rest for dinner (coconut oil, cinnamon, and a pinch of salt, roasted at 400*F for 45 minutes).


When your pumpkin is done baking, it should look like this: tender, squashy, and easy to spoon out.


Scrape the sides of the pumpkin gently. The rind is tender at this point and will tear easily - as you can see! I got at least two cups of pumpkin there. If you want to make it smoother for pies and puddings, put it in the blender or food processor for a minute. And you're done!

Saturday, September 05, 2015

Chicken Vegetable Saute with Pumpkin Sauce

Yeah, I know it sounds weird. I was honestly a little worried putting it together. "Will my husband eat this? Meh, probably. Will my kids eat it? Wellll...." Yep, it was like that. The whole time I was cooking.

In the end, they all ate it. My five-year-old even said it was nice. Win.

Ingredients
1/4 cup olive oil
1 yellow onion, chopped
2 medium carrots, cut into 1/2 inch pieces
1 tsp basil
1 tsp ginger
1-2 tsp salt
1/4 tsp pepper (omit for strict AIP)
1/2 head cauliflower (about 2 cups), stems removed and florets cut into bite-sized pieces
3-4 chicken breasts, also cut into bite-sized pieces (I have two small children. Everything gets cut into bite-sized pieces.)
3 cloves garlic, pressed
1 1/2 cups pumpkin puree

Directions
1. In a large skillet or wok, heat the olive oil and add the onion and carrots, as well as your seasonings. Saute covered for about 6 minutes.
2. Add your cauliflower and chicken and stir well. Cover and cook for 8-10 minutes, or until cauliflower is softening. 
3. Add your garlic and pumpkin puree. Mix well and simmer for 2-3 minutes to allow the flavors to blend.
4. Dish it up and dig in!

Note: The pumpkin adds a natural sweetness, so just be aware of that, in case you don't like your main course too sweet. You can always add more ginger or pepper if you find that it's too sweet for your liking.

Broccoli Salad with Carrot and Apple

This salad was a happy surprise. I didn't set out to make some miraculous dish or anything. I just wanted to make a salad my friends would be reasonably keen to eat at my birthday party! I'm happy to say, it turned out pretty decent.

Ingredients
1 large head broccoli, stems removed and florets cut to bite-size
One large carrot, shredded finely
One apple, diced 
1/4-1/3 cup dried cranberries or raisins
1/4 cup olive oil
2 Tbsp apple cider vinegar
1-2 tsp garlic paste
2 Tbsp coconut or palm sugar 

Directions
1. Mix the olive oil, vinegar, garlic paste, and sugar in a small dish. Set aside. 
2. In a large serving bowl, add the broccoli florets, shredded carrot, apple, and cranberries. Toss well. 
3. Add the dressing and mix until the entire salad is moistened. 
4. Refrigerate for several hours before serving to let the garlic mellow. Serve cold or room temperature.